

+
[op_liveeditor_element data-style=””][text_block style=”style_1.png” align=”left” font_size=”16″]
Lesson One: Starting Out Right
Barre chords can be a source of frustration, anxiety, even fear, for both novice and long-time guitarists.
Have you ever looked up a song, then decided not to play it because there are barre chords?
Have you ever had a song to perform and felt a pit in your stomach as that E flat major chord approached?
I promise you, you are not alone. I’ve met people who have been playing guitar for 20 years and still avoid playing barre chords.
It’s also important to remember that it’s NOT your fault. Barre chords are frustrating for many instructors as well. They may not remember how they learned to play them. It’s probable that it came easily to them, and they can’t figure out why it doesn’t come naturally to everyone else.
In the Barre Chord Companion, we are going to overcome the technical challenges that often make barre chords difficult. We’re going to eliminate “barre chord anxiety” by strategically changing the way you approach these chords.
Before we dig in, there are a few things we need to cover.
PRACTICE
Learning any skill takes patience and dedication. Fortunately, this isn’t going to take hours of practice every day. The key to success here is consistency. You need to practice at least 6 days each week for a minimum of 20 minutes. You get one cheat day ☺ I recommend breaking up your practice into two daily segments (e.g. 10 minutes in the morning, 10 minutes before bed), as our brains learn better with distributed practice.
Nerd Alert: For some background on how our brains learn kinesthetic processes like guitar, check out The Talent Code by Daniel Coyle.
EQUIPMENT
It is important to evaluate what other factors could be holding you back. Take a look at your guitar. How is the action? Action is the height of the guitar strings in relation to the fingerboard. When strings are too high off the fingerboard, it requires a significant amount of energy to hold them down.
If this is the case, you have a few options. You can take your guitar into a guitar shop and ask what it would cost to have the action lowered. If it isn’t going to require any major work or repairs, you might as well pay for them to do this. They might call it a “setup”, which basically means adjusting the guitar for optimal playability.
If that isn’t an option, or is too expensive, you might think about purchasing a new guitar. If you are a music therapist, educator, or someone else who needs a durable but sonically pleasing instrument, I recommend the Yamaha FG730S. I have played dozens of these guitars and have almost always been satisfied with the sound and playability. However, a new guitar might also need a setup. If you buy it from a local shop, ask them to do it as a condition of the purchase (“I’ll buy this guitar if you have your technician adjust the action for optimal playability”).
Finally, make sure you have good strings. If your strings have been on your guitar for more than 6 weeks, change them! As strings are played, and even if they sit unused, they become stiffer and harder to play.
Lesson One Summary: If you are going to be successful in this course, you have to commit. You need to practice a minimum of 20 minutes per day, at least 6 days a week, until you have achieved your goals. Consistency is key.
Set yourself up for success by making sure you have a high quality instrument. Notice I didn’t say an expensive instrument. It just has to sound good and play well. Make sure your strings are fresh!
[/text_block][/op_liveeditor_element]
[op_liveeditor_elements][/op_liveeditor_elements]
+
[op_liveeditor_element data-style=””][text_block style=”style_1.png” align=”left”]
Lesson Two: 7 Technique Secrets For Crystal Clear Barres
The most important piece to playing barre chords is not finger strength.
But if it’s not about strength, what’s it all about?
The answer is technique.
Some of the common explanations people give for not playing barre chords are: my fingers aren’t strong enough, my hands are too small, my guitar is too big…
Well, I have good news. These are, in almost all cases, not the real issues. I have relatively small hands and I learned to play barre chords when I had the hands of a 12-year-old. And I played them on a classical guitar, which has a wider neck than steel-stringed acoustic and electric guitars.
Was I just a boy prodigy? Far from it!
My body just keyed in to natural technique changes and leverage points that make these chords easier to play. And I’m going to share them with you.
7 Technique Secrets for Crystal Clear Barres
This section is the “meat and potatoes” of this guide. These 7 technique strategies are paramount in getting these chords to happen. Be sure to watch the video linked in lesson 2.
I recommend reading through all 7 strategies before implementing them one at a time.
1. Play close to the fret
You want to play the barre close to the fret you are barring. Playing there requires the least amount of work to produce sound. That is, the further back in the fret space you place your barre, the harder you must work to depress the strings. Also, try rotating your finger slightly toward the nut. The top edge of your finger is bonier, which creates a nice contact with the strings. The palm-side of your finger is fleshy and not very conducive to barring. If you practice daily, a callous will form along this bony ridge, making it easier to get all of the strings down.
[/text_block][/op_liveeditor_element]
[op_liveeditor_element data-style=””]

[/op_liveeditor_element]
[op_liveeditor_element data-style=””][text_block style=”style_1.png” align=”left”]
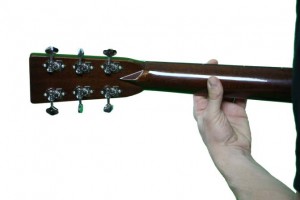
2. Doorknob. Not Lobster. (Thumb placement)
Place your thumb on the back of the neck, opposite your barre, but a little bit closer to the body of the guitar. This allows you to torque your hand slightly, creating leverage for your first finger. See the video called “Doorknob. Not Lobster”:
[/text_block][/op_liveeditor_element]
[op_liveeditor_element data-style=””]
[/op_liveeditor_element]
[op_liveeditor_element data-style=””]
[/op_liveeditor_element]
[op_liveeditor_element data-style=””][text_block style=”style_1.png” align=”left”]
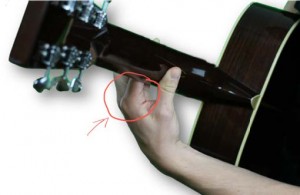
NOTE: Some guitarists (and teachers, even) find it easier if they adjust their thumb slightly to point toward the nut. I don’t typically do this, but I don’t have a strong objection if it helps you make the chord happen. Just watch for unnecessary tension.
3. Keep your first knuckle up
This is a difficult rule to explain, but it’s one of the most important. You want your first knuckle, where the palm meets the finger, to be even with or a little in front of the fingerboard. Sometimes the tendency is to have that knuckle behind the fingerboard, which forces you to squeeze your fingers in order to get the strings down. Positioning your hand the way I’m telling you to allows you to employ some of your arm strength and to use the torque from rotating against your thumb.
[/text_block][/op_liveeditor_element]
[op_liveeditor_element data-style=””]
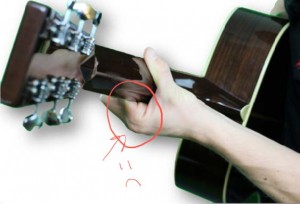
Do This
[/op_liveeditor_element]
[op_liveeditor_element data-style=””]
Not this
[/op_liveeditor_element]
[op_liveeditor_element data-style=””][text_block style=”style_1.png” align=”left”]
4. Use the weight and strength of your arm
Your shoulder is stronger than your arm, your arm is stronger than your wrist, and your wrist is stronger than each individual finger. We want to think about our barre chord strength originating much higher up the arm than the fingers.
If you follow strategies 1-3 AND think about using your arm strength instead of finger strength, you will be in good shape.
To practice, grab onto the neck of the guitar with your left hand (right hand if you’re a leftie) and just let it hang. Notice the weight of your arm. You can use the natural weight of your arm to help get the strings down.
To get used to that, look at strategy number 5…
5. Hug the guitar
We do this for two reasons. First, the guitar is our friend, and we want it to feel loved (awwwww). Second, hugging the guitar engages your shoulder and arm muscles. To “hug” the guitar, pull it gently toward your body with both arms.
The direction of the “force” with your left hand, which is a combination of arm strength and weight, is toward your waist. With your right hand, you are gently squeezing the body of the guitar toward your torso with your elbow and upper arm. This creates a counter force, essentially pushing the neck of the guitar into the barre in the left hand.
6. Don’t overwork
Barre chords require more work than open chords. Try to be efficient with your barring. When you’re moving between barre chords, or playing a rhythmic strumming pattern that has some space in it, release the tension on the barre and relax for a brief moment. A half-second of relief doesn’t sound like much, but within the context of a song, many little breaks add up and help prevent fatigue.
Additionally, you can get a nice percussive sound when you strum while lightly touching the strings (i.e., when you’re relaxing the barre). This can preserve energy and make a strumming pattern more interesting.
Acknowledge that your barre usually doesn’t have to depress every single string. For example, when you’re playing a B Major barre chord at the seventh fret, strings 3, 4, and 5 are played by your 2nd, 4th, and 3rd fingers, respectively. That means that the barre is only responsible for strings 1, 2, and 6. Focus your barre’s energy on those strings, and let your other fingers handle the other strings.
[/text_block][/op_liveeditor_element]
[op_liveeditor_element data-style=””]

[/op_liveeditor_element]
[op_liveeditor_element data-style=””][text_block style=”style_1.png” align=”left”]
7. The little things
There are a couple other little things to check that can make a big difference. Are your nails short enough? The very tips of your fingers (especially your non-barring fingers) need to be able to make contact with the fingerboard, when perpendicular to it, without any interference from fingernails.
This will help you to keep your fingers tall and curved. Try not to let them collapse at the knuckle.
Remember that a callous will develop on the ridge of your index finger. If you haven’t been playing barre chords, it’s probably fairly squishy right now. Give it some time, and try to be consistent with your practice. And don’t worry, it’s not a big, ugly callous. It just toughens a bit.
When preparing to practice barre chords, it’s a good idea to stretch your fingers, forearms, even your shoulders, before you begin. A little tension and initial discomfort is normal. However, if you notice severe tension in your hands, back, or neck, take a break and stretch it out. We don’t want any injuries!
That’s it! Those are the 7 technique secrets for barre chords. You may be producing clear chords by now. If not, practice these technique suggestions while working through Lesson Three: Steps to a Crystal Clear Barre.
[/text_block][/op_liveeditor_element]
[op_liveeditor_elements][/op_liveeditor_elements]
+
[op_liveeditor_element data-style=””][text_block style=”style_1.png” align=”left”]
Lesson Three: Barre Exercises
In this lesson, we are going to use a step-by-step process to achieve a big, beautiful barre. And we’re going to start with just two strings. Follow the steps as they are presented in this video:
[/text_block][/op_liveeditor_element]
[op_liveeditor_element data-style=””]
[/op_liveeditor_element]
[op_liveeditor_element data-style=””][text_block style=”style_1.png” align=”left”]
Exercise One
Start by just barring strings 1 and 2 (that’s the high e and b strings) at the 7th fret with your first finger. Remember the 7 secrets as you are doing this. Gradually move your barre toward the nut fret by fret, strumming the two strings after each shift. If you get string buzz, take a short break, then start at the most recently successful fret (i.e., if fret 3 sounds buzzy, start back at fret 4 after your brief break).
Exercise Two
Follow the same process as exercise one, this time barring strings 1, 2 and 3. Remember to take breaks as necessary.
Exercise Three
Follow the same process as exercise two, but this time using strings 1, 2, 3, and 4.
Exercise Four
Is this getting monotonous? Same exercise, barring strings 1 through 5. It’s a pain, but it’s necessary!
Exercise Five
You know what’s coming. This is your full barre. Remember to start at the seventh fret, where there is less tension. Review the barre chord rules in Lesson Two before beginning. Work this all the way down to the first fret, taking breaks when necessary.
If you achieved a crystal clear barre all the way down, CELEBRATE! Remember that it is rare that you will ever have to barre every single string all at once because your other fingers will be playing some of the internal strings. You’ve done it, and you are ready to apply this skill to a ton of basic and complex barre chords! Congratulations!
[/text_block][/op_liveeditor_element]
[op_liveeditor_elements][/op_liveeditor_elements]
+
[op_liveeditor_element data-style=””][text_block style=”style_1.png” align=”left”]
Lesson Four: Toward Effortless Barre Chords
After practicing these rules and exercises for a few days or weeks, you should be getting comfortable with your barring technique. In this guide, we’ve focused strictly on the barre itself and not on the basic barre chords. When you’re ready, start applying the rules from this guide to barre chords that come up in your playing.
It is one thing to be able to produce a clear barre, and another to be truly comfortable and competent in finding and playing barre chords.
To truly harness the power of the barre, we have to go a few steps further.
The first step is to master the 6 basic barre chord shapes. The 6 can be broken down into two primary categories: E shapes and A shapes. They model the open chords E and A. They can also be broken down by chord quality: major, minor, and 7th. In the appendix, you can see a video and an exercise for learning E (major and minor) and A (major and minor) barre chord shapes.
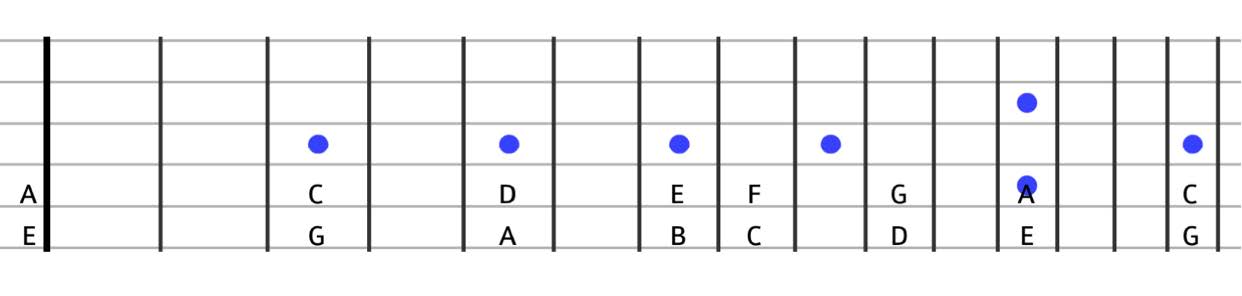
Step two is to develop an understanding of the fretboard that allows you to find the best locations for these chords very quickly. There is a reference for this in the appendix as well.
Many people stop after the second step and, for all intents and purposes, they sound ok. They can play a lot of songs. But to take it to the next level, we can develop a repertoire of harmonically rich chords that go beyond just basic major, minor and 7th chords. I’m talking about major 7th, minor 11th, 13th, minor 9th, and more. This is the third step, and it also requires discussion about when to use these interesting new chords correctly.
Finally, we want to practice integrating these new skills by learning and playing lots of songs. That is, after all, the true test.
Unfortunately, those skills require more intensive media and tools than can be provided in this mini-course.
There are also many YouTube tutorials. The upside is that they are free, but the downside is that not all the content on YouTube is helpful. In fact, some of the videos are potentially harmful. There are some decent instructors, but you may learn things out of sequence.
Another option is to continue your learning with me. I’ve created a set of videos, visuals, and tools to streamline and systematize the learning and integration of these barre chord skills. You get access to a step-by-step process with numerous video tutorials and play-along practice guides. Most importantly, it is FUN!
Altogether, the course is called the Barre Chord Boot Camp, and it now available when you upgrade to the Music Therapy Source Guitar Club.
Music therapists have the opportunity to earn CMTE credits in the Barre Chord Boot Camp.
Thank you for purchasing The Barre Chord Companion course, and kudos on your initiative to improve this tricky part of guitar playing.
[/text_block][/op_liveeditor_element]
[op_liveeditor_elements][/op_liveeditor_elements]
+
[op_liveeditor_element data-style=””][text_block style=”style_1.png” align=”left”]
E Shaped Barre Chords
[/text_block][/op_liveeditor_element]
[op_liveeditor_element data-style=””]
[/op_liveeditor_element]
[op_liveeditor_element data-style=””][text_block style=”style_1.png” align=”left”]
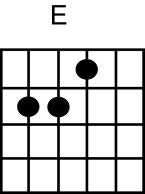
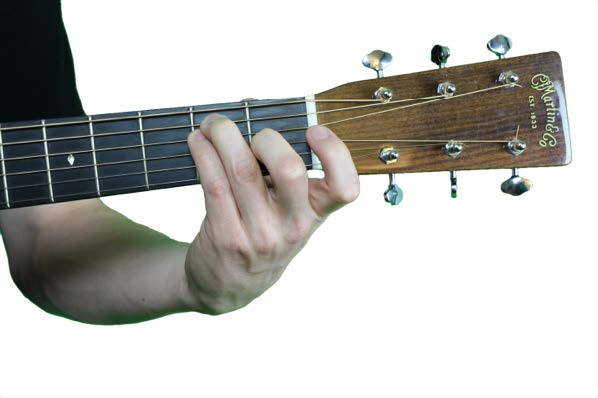
E shaped barre chords have their root on the 6th string. We build them by playing the E chord using fingers 2, 3, and/or 4. Start by playing an E major, but with fingers 2, 3, and 4 as in the picture.
[/text_block][/op_liveeditor_element]
[op_liveeditor_element data-style=””]
[/op_liveeditor_element]
[op_liveeditor_element data-style=””]
[/op_liveeditor_element]
[op_liveeditor_element data-style=””][text_block style=”style_1.png” align=”left”]
Then move it up seven frets and use your first finger to essentially create a new nut just behind the chord shape:
[/text_block][/op_liveeditor_element]
[op_liveeditor_element data-style=””]
[/op_liveeditor_element]
[op_liveeditor_element data-style=””][text_block style=”style_1.png” align=”left”]
Because it’s an E shape, your root is still on the E string. So this would be a B major. If you lift your 2nd finger, it’s a B minor. If you leave the 2nd finger but lift your 4th finger, it’s a B7.
A Shaped Barre Chords
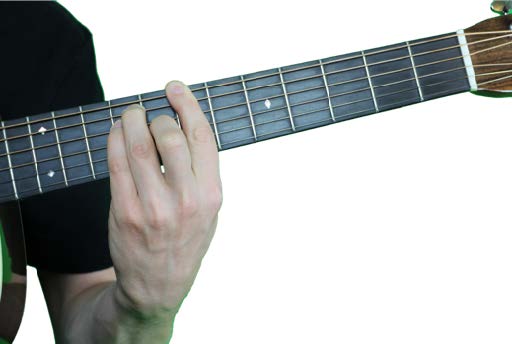
The same goes for A. Play it in an open position, but with fingers 2, 3, and 4:
[/text_block][/op_liveeditor_element]
[op_liveeditor_element data-style=””]

[/op_liveeditor_element]
[op_liveeditor_element data-style=””]

[/op_liveeditor_element]
[op_liveeditor_element data-style=””][text_block style=”style_1.png” align=”left”]
Then move those fingers up to the 8th fret and barre the 6th fret with your first finger.
[/text_block][/op_liveeditor_element]
[op_liveeditor_element data-style=””]

[/op_liveeditor_element]
[op_liveeditor_element data-style=””][text_block style=”style_1.png” align=”left”]
Because it’s an A shape barre chord, your root is on the 5th string. In this case, it’s an Eb major. For the minor and 7th versions of this chord, you would rearrange your fingers to look like A minor or A7 while keeping the barre in place.
[/text_block][/op_liveeditor_element]
[op_liveeditor_element data-style=””][text_block style=”style_1.png” align=”left”]
Root Finding Tool
[/text_block][/op_liveeditor_element]
[op_liveeditor_element data-style=””]
[/op_liveeditor_element]
[op_liveeditor_elements][/op_liveeditor_elements]